What is Negative Painting in Watercolor?
Negative painting is where you define the shape of the object by painting the space (negative space) around it.

I painted these white cone flowers using the negative painting technique.
Below, I have included an exercise that you can do to help you get the hang of negative painting. Let me know how you make out.
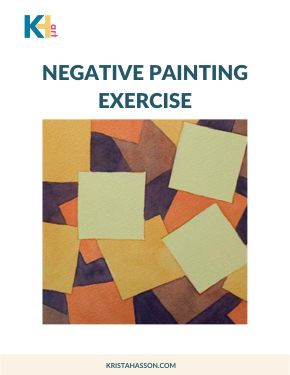
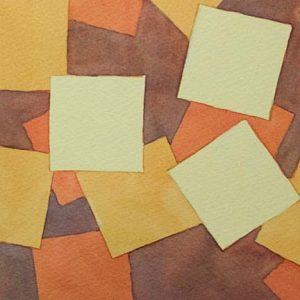
Negative Square Painting Exercise

The supplies I used for the exercise
- Hansa Yellow (light cool yellow)
- New Gamboge yellow (medium warm yellow)
- Cobalt blue (medium cool blue)
- Quinacridone red (medium cool red)
For this exercise I used a 6×6” square and made my smaller squares 2×2”, but you can make it any size you want.
I have a free pdf version of this article so if you would like to save this exercise and do it at your own leisure fill in the form below. Scroll down to continue reading the article and exercise 🙂
Step-by-step exercise

Start this exercise by wetting your paper and paint it wet in wet with your light yellow (Hansa) paint. Let it dry completely (use a hairdryer to speed things up if you want).

Once this is dry draw 3 smaller squares (not touching) on your paper. Paint around these squares negatively with your medium yellow (Gamboge). Let it dry completely.

Draw on more squares (not too many, leave room for more) letting the first ones overlap.
✨ Want to follow along with this demo at your own pace?
Get instant access to my full Joyful Art Resources Library—printable guides, step-by-step demos, supply lists, and more.

Paint the negative spaces with quinacridone red, leaving the yellow squares. Dry completely before moving on.
Draw a few more squares on the quinacridone red layer and paint the negative areas with a layer of cobalt blue. Dry completely.
Then draw in your last few squares on the cobalt layer. Mix a nice purple with quinacridone red and cobalt to apply to the last few negative spaces left. You have created colored squares without painting squares.
This technique works great for background layers of leaves or trees and many others. Paintings can have both negative and positive painting in them.
This technique can really add interesting areas and backgrounds in your paintings. Try it out, the possibilities are endless.
Thank you for sharing your time with me!
Cheers,
Krista
PS: sharing is always appreciated!
Read more articles on painting HERE
Wow, I want to try this! Saving on pinterest for the future.
Thanks so much for all of the effort in doing that exercise!
Hi Rhonda, you are very welcome 🙂 Let me know how you make out
Krista you are rocking this…..
Thank you Judi, I am glad that you think so 🙂
Excellent lesson Krista. I love what you are doing.
Thank you very much, Francine, I am so happy to be able to share my knowledge with you 🙂 Thank you for being here!
I will be trying this exercise Krista as negative painting has interested me. Seeing the visuals has helped clarify the process. So enjoying the blog!!
Awesome Carol, I am so glad you are enjoying the articles 🙂
I am enjoying your new blog. I found you while researching watercolor batik and would love to find out more about this technique, including how you learned it yourself.
Hi Kim, I am so glad you are enjoying your time here. I will be writing about watercolor batik as well. My journey with watercolor batik started in 2010, I had a roll of rice paper and wondered what I could do with it. I read an article about the method and I experimented with it until I found a way to get the results that I wanted. I love it!
Thank you so much for your weekly lessons!! I have been wanting lessons for some time and can’t afford them or the teachers haven’t shown me valid techniques with solid information. I know styles are personal and all is open to creation. However you give me a great base to work from!
You are very welcome Susan. I had the same experience when I was first learning to paint. My main purpose of these articles is to help people with building their skill set as artists. I am so glad you are finding it helpful. 🙂
This is a good exercise although I think I will work with a variety of shapes to make the painting more interesting. Thanks Krista.
Thank you, Val 🙂 You can use any shape you like. It is really fun to do with leaves. Mix it up and have fun!